

Table of Contents
Android Dagger 2:
Dagger 2 is dependency injection framework, in this tutorial i want to explain Android Dagger 2 with a simple example to understand the concept easily.We will make use of String and int to make it easier to understand.
In real time the usage is quite a bit different where the reusable modules are defined and are injected using android dagger 2 dependency injection.
For example when we want to implement a module for calling network calls which is a default method for entire app as every module network call will have same code with different parameters and methods of course.
Here we use annotations for performing necessary actions
@Module, @Component, @Singleton @Provides, @Inject.
Module :
Defines the classes which provides the dependency’s
Provides :
Defines the methods which provides the dependency’s
Component :
Forms a bridge to enable modules and perform dependency injections.
Inject :
This annotations helps to bind the dependency by requesting the appropriate task to be performed with constructors, methods and fields.
Singleton :
Single instance of object is created and provided.
Dependency :
Add android dagger 2 to your project (better to add latest version of dagger)
implementation 'com.google.dagger:dagger:2.27'
annotationProcessor 'com.google.dagger:dagger-compiler:2.27'
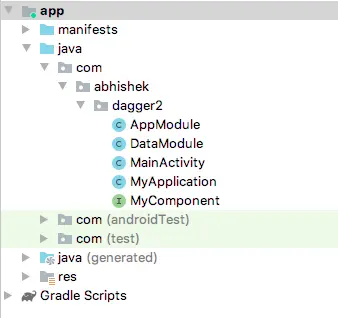
Project Structure :
The project structure for the android dagger 2 project is depicted in this screen, to avoid any confusion for beginners.
DataModule :
Here we provide String and int so that we can inject them in our depending activity’s.
import javax.inject.Singleton;

import dagger.Module;
import dagger.Provides;

@Module
public class DataModule {

    @Provides
    @Singleton
    String getString(){

        return "Androidcoding.in";
    }

    @Provides
    @Singleton
    int getInteger(){

        return 123;
    }

}
AppModule :
Specifying the Application class with @Provide annotation
import android.app.Application;

import javax.inject.Singleton;

import dagger.Module;
import dagger.Provides;

@Module
public class AppModule {

    private Application myApplication;

    AppModule(Application myApplication) {
        this.myApplication = myApplication;
    }

    @Provides
    @Singleton
    Application getMyApplication() {
        return myApplication;
    }
}
MyApplication.class
With builder make use of modules declared.
import android.app.Application;

public class MyApplication extends Application {

    private MyComponent component;

    @Override
    public void onCreate() {
        super.onCreate();

        component = DaggerMyComponent.builder()
                .appModule(new AppModule(this))
                .dataModule(new DataModule())
                .build();
    }

    public MyComponent getComponent(){
        return component;
    }
}
MyComponent :
Make use of modules which will help to provide injection acting as a bridge in between module and activity.
import javax.inject.Singleton;

import dagger.Component;

@Singleton
@Component(modules = {AppModule.class, DataModule.class})
public interface MyComponent {
    void inject(MainActivity mainActivity);
}
activity_main.xml
Add two text views to display the data using android dagger 2.
<?xml version="1.0" encoding="utf-8"?>
<androidx.constraintlayout.widget.ConstraintLayout xmlns:android="https://schemas.android.com/apk/res/android"
    xmlns:app="https://schemas.android.com/apk/res-auto"
    xmlns:tools="https://schemas.android.com/tools"
    android:layout_width="match_parent"
    android:layout_height="match_parent"
    tools:context=".MainActivity">

    <TextView
        android:id="@+id/txtString"
        android:layout_width="wrap_content"
        android:layout_height="wrap_content"
        android:layout_marginTop="236dp"
        android:gravity="center"
        android:textSize="35dp"
        android:textColor="@color/colorPrimary"
        app:layout_constraintEnd_toEndOf="parent"
        app:layout_constraintHorizontal_bias="0.494"
        app:layout_constraintStart_toStartOf="parent"
        app:layout_constraintTop_toTopOf="parent" />

    <TextView
        android:id="@+id/txtInt"
        android:layout_width="wrap_content"
        android:layout_height="wrap_content"
        android:layout_marginTop="108dp"
        android:gravity="center"
        android:textSize="30dp"
        android:textColor="@color/colorAccent"
        app:layout_constraintBottom_toBottomOf="parent"
        app:layout_constraintEnd_toEndOf="parent"
        app:layout_constraintStart_toStartOf="parent"
        app:layout_constraintTop_toBottomOf="@+id/txtString"
        app:layout_constraintVertical_bias="0.0" />

</androidx.constraintlayout.widget.ConstraintLayout>
MainActivity.class
Providing the full source code for android dagger 2
Initialize the injection providing the context
((MyApplication) getApplication()).getComponent().inject(this);
Initialize variables providing @Inject annotation.
@Inject
String abc;

@Inject
int num;
Now we need to assign the String values to the textviews you can also use databinding’s
import androidx.appcompat.app.AppCompatActivity;

import android.os.Bundle;
import android.widget.TextView;

import javax.inject.Inject;

public class MainActivity extends AppCompatActivity {

    @Inject
    String abc;

    @Inject
    int num;


    @Override
    protected void onCreate(Bundle savedInstanceState) {
        super.onCreate(savedInstanceState);
        setContentView(R.layout.activity_main);

        ((MyApplication) getApplication()).getComponent().inject(this);

        TextView txtString = findViewById(R.id.txtString);
        TextView txtInt = findViewById(R.id.txtInt);

        txtString.setText(abc);
        txtInt.setText(""+num);

    }


}
Output :
The output shows the String value is set to textview using the android dagger 2 dependency injection

If you are having any query’s in this tutorial on android dagger 2 do let us know in the comment section below.If you like this tutorial do like and share for more updates.